
In this Oracle Apex tutorial, I will show you how to create a master-detail form/interactive grid manually. Wondering why manually? When there is an option to create it through the wizard in Oracle Apex. It is because, when you create the master-detail form through the wizard, you do not know the settings that happened behind to create the master-detail relationship between the tables. And when you will create the master-detail form manually you will know the settings and would be able to add more tables to it easily. To demonstrate this example, I am using Oracle Apex 19.2.
Steps to Create a Master-Detail Form/Interactive Grid Manually in Oracle Apex
1. Create a blank page in Oracle Apex as shown in the below image:

Give a name to your master-detail page and set the page mode and breadcrumb according to your needs and then click on the Next button. Then on the next step, select the navigation menu and click on Next then Finish.
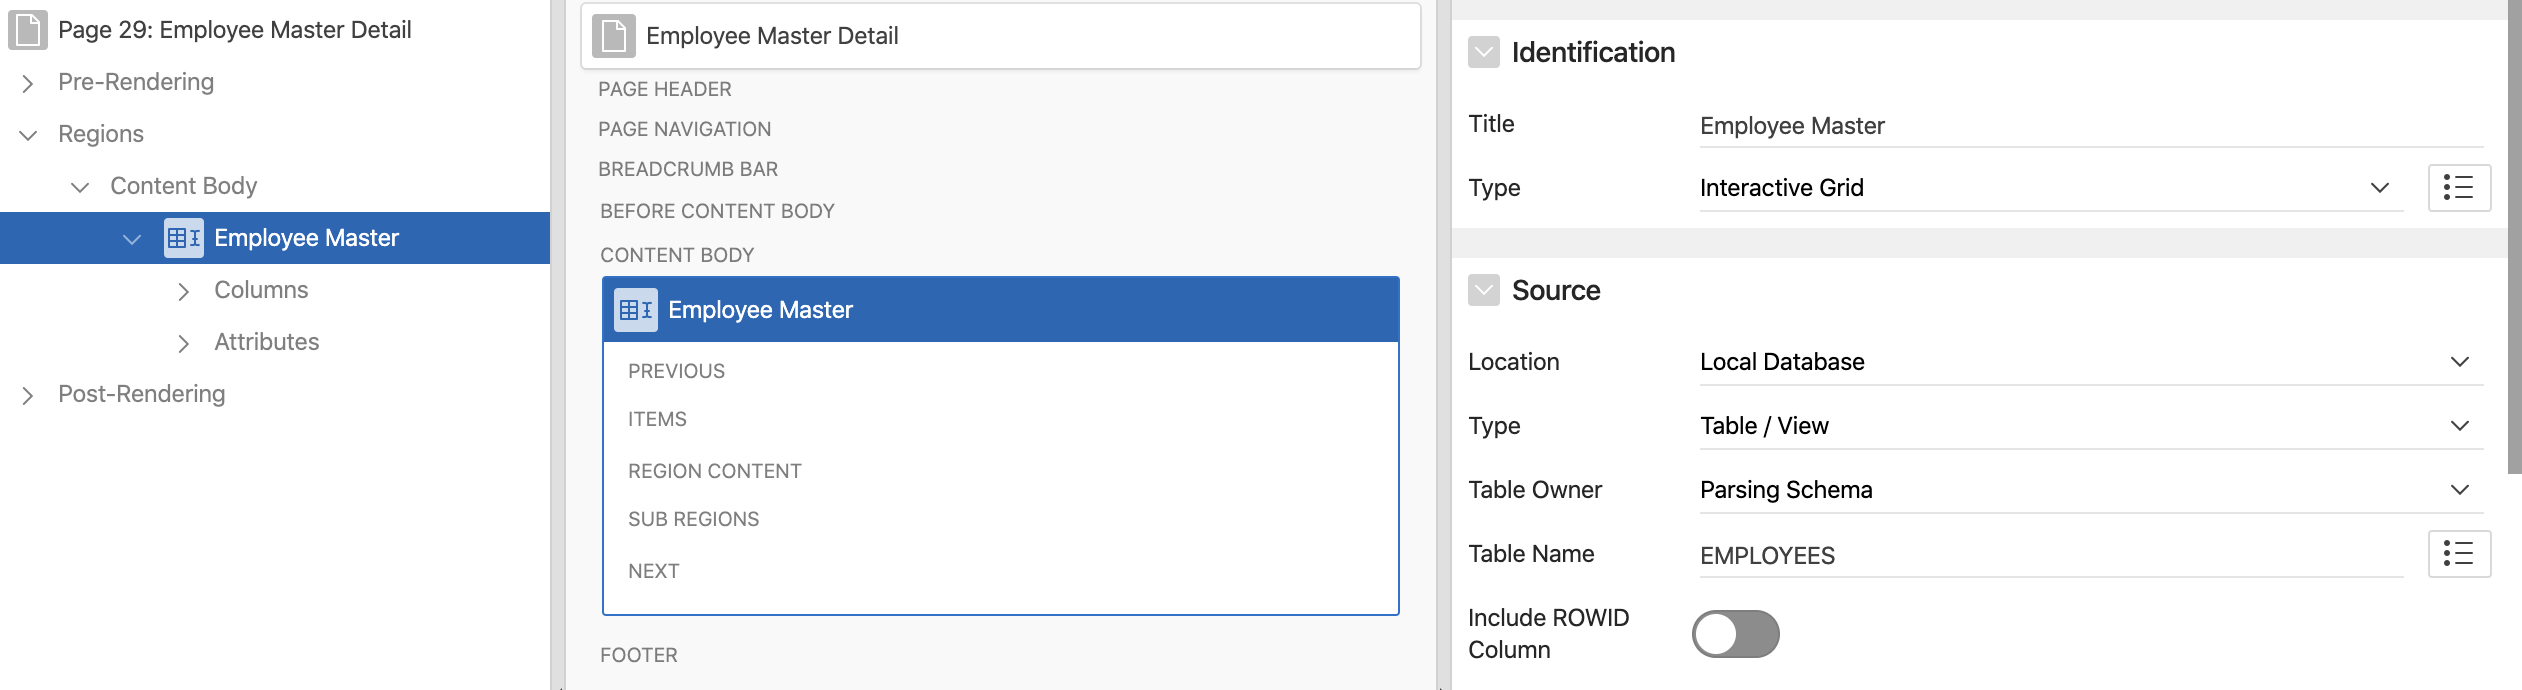
2. You have created a blank page. Now add an Interactive Grid to it. I am using the EMPLOYEES table to create the interactive grid and this table has the primary key EMPLOYEE_ID. To create an interactive grid region, do the right-click on the Content Body and select Create Region option. Then set the following properties (also shown in the image below):
- Title: Employee Master
- Type: Interactive Grid
- Source Type: Table
- Table Name:
EMPLOYEES
3. Then click on the Attributes node and enable the edit mode for the interactive grid as shown in the below image:

4. Now you must specify the Primary Key for the interactive grid so that you can add detail tables to the page and can link them with it. For this EMPLOYEES table, the Primary Key is EMPLOYEES_ID. To specify the primary key, open the Columns node and then select the column EMPLOYEE_ID and switch on the Primary Key button in the source section, as shown in the below image:

Note: If you have multiple primary key columns for the master table, then repeat the above step (4) for every column.
5. Now I have one more table EMPLOYEE_DOCS, which I will add as the detail table. To do this, do the right-click on the Content Body and select the Create Region option and then set the following properties shown in the below image:
- Title: Employee Docs
- Type: Interactive Grid
- Source > Table Name:
EMPLOYEE_DOCS - Include ROWID Column: Yes
- Master-Detail > Master Region: Employee Master (Select the master region)

Note: In the first master table (EMPLOYEES for the region Employee Master), we define the Primary Key as EMPLOYEE_ID and didn't include the ROWID column, which is correct. But for the detail table, you do not need to specify the Primary Key column, just include the ROWID column and it will be set as Primary Key column so that insert, update and delete can happen on the behalf of ROWID column for this detail table. But now, you need to link the column EMPLOYEE_ID of EMPLOYEE_DOCS table to the master table column EMPLOYEE_ID of EMPLOYEES table for the master-detail relationship. To do that follow this step:
6. Enable the edit mode for the Employee Docs region. To do this click on the Attributes node and then click on the Enabled button (as shown in the 3rd step).
7. Now link the EMPLOYEE_DOCS table column EMPLOYEE_ID with the EMPLOYEES table column EMPLOYEE_ID. To do this, open the columns node of Employee Docs region and click on the EMPLOYEE_ID column and set the following settings:
- Type: Hidden (this column should be hidden as it is the detail column)
- Master-Detail > Master Column:
EMPLOYEE_ID

Note: If you have multiple primary key columns in the master table, then repeat the 7th step for every column in the detail table.
Now if you want to add more tables to this form, you can repeat the steps from 5th to 7th.
Related tutorials:
To learn more about the master-detail form in Oracle Apex 19.1, check the Oracle Documentation.


when I click on the records it does not block the background with that of the margin for users to click on various records and causes an error. know how to solve this?
Yes you are right, this issue happens sometimes. You can use the following method:
Remove the Master Detail property setting for the above grids.
Create a dynamic action for the first/master grid on Selection change event to execute the JavaScript code. And set a hidden item for example (P3_HIDEMPNO) with the primary key column value. Following is the JavaScript code example:
var n_selempno,

model = this.data.model;

apex.item( "P3_HIDEMPNO" ).setValue ('');

for ( i = 0; i < this.data.selectedRecords.length; i++ ) {

  n_selempno = model.getValue( this.data.selectedRecords[i], "EMPNO");

}

apex.item( "P3_HIDEMPNO" ).setValue (n_selempno);
Now create another true action for the above dynamic action to refresh the below/child grid. Also, make sure to specify where condition using the hidden item in the child grid for example:
THANK YOU VERY MUCH, IT WORKED PERFECTLY
can we create a master-detail page manually using a Form (master) and editable Interactive Grid (detail), if yes then how, what are the necessary steps to achieve it? or any link which provide us tutorial for noobs.
Yes, please check the following post Creating Master-Detail form in Oracle Apex on DEPT and EMP tables.
Is there a way to change the style from "Stacked" to "Side By Side"?